607 Final Project Part I - Azure SQL Transactions Database
Tyler Frankenberg
5/15/2021
Step 1… Provisioning the Azure SQL database and Azure Blob Storage container
This project started with provisioning an Azure SQL database on a brand new server, dedicated for this project. My aim was to establish a database in the cloud I could manage using SQL Server Management Studio or Azure Data Studio. In this database, we’ll be taking the UCI Machine Learning .csv file of transaction data and hosting it in normalized tables that simulate a basic transaction schema.
Azure for students
A note for students: Microsoft Azure offers a free student version (requires verification from a .edu email address) that makes most of the Azure platform’s features - from blob storage, to Data Factory, to Virtual Machines, and SQL Databases - free to access for a year. Access at https://azure.microsoft.com/en-us/free/students/.
Create the database curdferguson1/mba_affinity in the Azure Portal
From the Azure account portal, a new SQL database can be provisioned with a simple user interface that walks through the process. A server will need to be created to host the database if one does not exist already.

A basic 5 DTU (Data Transaction Unit - Microsoft’s all-in-one measure for database storage capacity, performance speed, and read/ write bandwidth) database up to 50GB is included in the free “Azure for Students” pricing tier, and costs $4.99/ mo. otherwise.
(And for all of your burning questions about how DTUs are computed, check out https://sqlperformance.com/2017/03/azure/what-the-heck-is-a-dtu.)

Azure Blob Storage Container
While we’re at it, let’s provision an Azure Storage Account that will give us a convenient place to host the .csv files we’ll use to populate the eventual tables in our mba_affinity database.
The process is very similar to setting up our database above, and analogous. We’re first going to set up our storage account curdferguson…

…and then create a ‘container’, which will store the .csv files we’ll reference in our BULK INSERT SQL commands momentarily, to populate the database.
Take note of the Public Access Level Container specified here - this must be selected to allow direct access to the files stored therein.

Step 2: Connect to Microsoft SQL Server Management Studio 2019
To connect, we enter our database url, local port, and the server admin credentials we’ve defined for server curdferguson1 in MS Azure, in the SQL Server Management Studio login.

Once successfully connected, we can see the database mba_affinity in our Object Explorer.

Connect Blob Storage to SQL Database
We neeed to set up Azure Blob Storage Container mba_affinity as an external data source so that we can access it within our SQL Server queries. We start by opening up a new query window within SQL Server Management Studio, and follow the following steps:

We create a master key with unique password through the
CREATE MASTER KEYcommandWe use the
CREATE DATABSE SCOPED CREDENTIALcommand to store a unique, time limited, Shared Access Signature that authenticates our access to the container. Our Shared Access Signature is created from the settings page of ourmba_affinityAzure blob storage container…

- Finally, we use the
CREATE EXTERNAL DATA SOURCEcommand to instantiate the connection! Once set up, we can seeazure_mba_affinityas an external data source in our Object Explorer…

Step 4: Import the Online_Retail_II dataset to R, and wrangle into four BULK INSERT - ready .csv files
Load the tidyverse library
library(tidyverse)Import Online_Retail_II
url <- "https://raw.githubusercontent.com/curdferguson/CUNY607final_MarketBasket/main/online_retail_II.csv"

online_retail <- read.delim(url, sep = ",", encoding = "UTF-8")

online_retail <- rename(online_retail,  InvoiceID = X.U.FEFF.Invoice, CustomerID = Customer.ID)

head(online_retail)
## InvoiceID StockCode Description Quantity
## 1 536365 85123A WHITE HANGING HEART T-LIGHT HOLDER 6
## 2 536365 71053 WHITE METAL LANTERN 6
## 3 536365 84406B CREAM CUPID HEARTS COAT HANGER 8
## 4 536365 84029G KNITTED UNION FLAG HOT WATER BOTTLE 6
## 5 536365 84029E RED WOOLLY HOTTIE WHITE HEART. 6
## 6 536365 22752 SET 7 BABUSHKA NESTING BOXES 2
## InvoiceDate Price CustomerID Country
## 1 12/1/2010 8:26 2.55 17850 United Kingdom
## 2 12/1/2010 8:26 3.39 17850 United Kingdom
## 3 12/1/2010 8:26 2.75 17850 United Kingdom
## 4 12/1/2010 8:26 3.39 17850 United Kingdom
## 5 12/1/2010 8:26 3.39 17850 United Kingdom
## 6 12/1/2010 8:26 7.65 17850 United KingdomCreat out BULK INSERT .csv files
Our relational database will have 4 tables:
- customers
- items
- invoices
- invoice_lines
The transformations here will ensure we format all records correctly in order to smoothly populate our tables in the database mba_affinity.
# customer table
customers <- online_retail %>% filter(!is.na(CustomerID) & CustomerID != 12370) %>% distinct(CustomerID, Country) %>% arrange(by = CustomerID)
customers <- customers %>% filter(!duplicated(CustomerID))

#write_delim(customers, file = "customers.csv", delim = ",", na = "NULL", append = FALSE, col_names = TRUE)

# items table
items <- online_retail %>% filter(!is.na(StockCode) & CustomerID != 12370) %>% distinct(StockCode, Description, Price) %>% arrange(by = StockCode)
items$Description <- items$Description %>% str_replace_all(",", " ")
items <- items %>% filter(!duplicated(StockCode))
items$Price <- round(items$Price, 2)

#write_delim(items, file = "items.csv", delim = ",", na = "NULL", append = FALSE, col_names = TRUE)

# invoices table
invoices <- online_retail %>% filter(!is.na(InvoiceID) & CustomerID != 12370) %>% distinct(InvoiceID, InvoiceDate, CustomerID) %>% arrange(by = InvoiceID)
invoices$InvoiceID <- invoices$InvoiceID %>% str_trim(side = c("both"))
invoices <- invoices %>% filter(!duplicated(InvoiceID))

#write_delim(invoices, file = "invoices.csv", delim = ",", na = "NULL", append = FALSE, col_names = TRUE)

#invoice_lines table
invoice_lines <- online_retail %>% filter(!is.na(InvoiceID) & CustomerID != 12370) %>% mutate(LineID = "") %>% distinct(LineID, InvoiceID, StockCode, Quantity) %>% arrange(by = InvoiceID)
invoice_lines <- invoice_lines %>% select(LineID, InvoiceID, StockCode, Quantity)

#write_delim(invoice_lines, file = "invoice_lines.csv", delim = ",", na = "NULL", append = FALSE, col_names = TRUE)
Upload to Azure container…
On our way back to SMSS, we’ll briefly pop back to our Azure storage container mba_affinity and upload our four .csv data files…

Step 5: Populate the mba_affinity Database
CREATE TABLES & BULK INSERT
We’re now ready to create our four tables, and populate them using bulk insert, an operation that takes approximately 1 minute.

ALTER TABLES to establish keys defining parent-child relationships


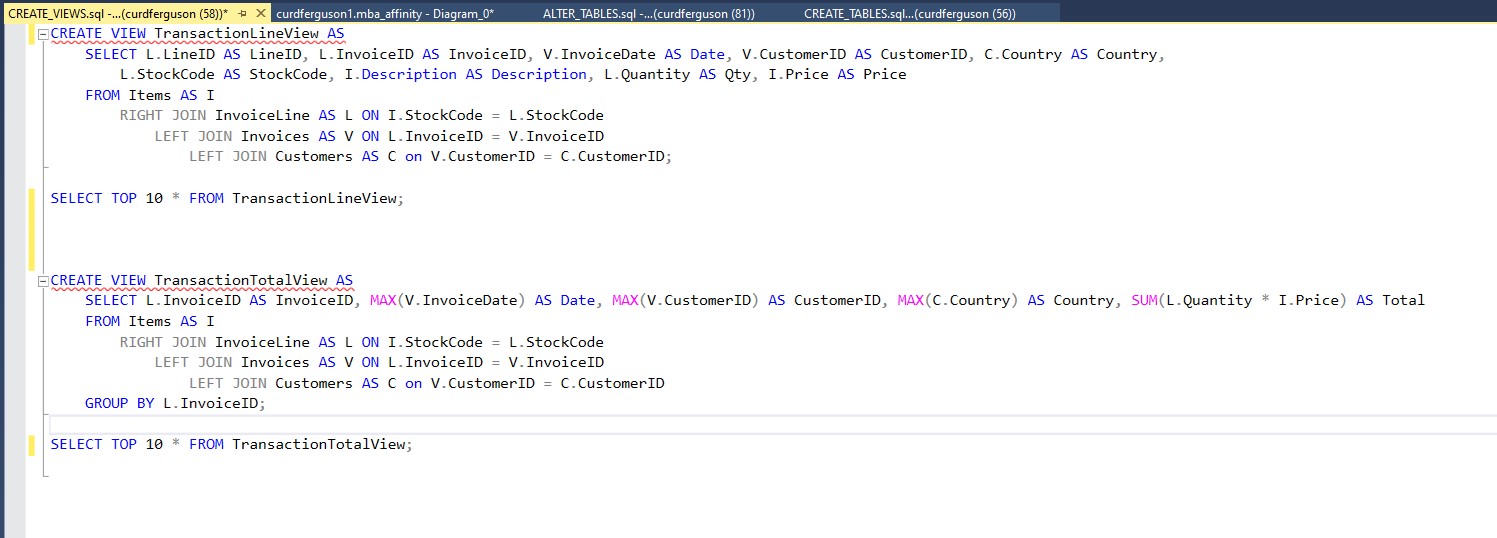
We end up with a basic normalized schema that joins our four tables to organize and store our transactional data. To access it in the most efficient and streamlined way, we’ll use views. TransactionLineView recreates the initial Online Retail II dataset, while TransactionTotalView displays one line for each invoice and its total, aggregated from the individual Invoice Lines.
[]!(https://raw.githubusercontent.com/curdferguson/CUNY607final_MarketBasket/main/SMSS_create_views.jpg)
Step 6: Create a Keyring to secure database access in R
Note: Code in this section and in Step 7 was adapted from 607 Group Project 3 and credited to that group, especially Esteban Aramayo, Daniel Sullivan and Eric Hirsch.
library(keyring)

# ***************************************************************************************************************
# Before connecting to the database, let's do a ONE-TIME set up of a Key Ring to secure the database credentials
# Uncomment the lines of code below to set up your key ring. Then within it set the database credentials
# Once the setup is completed comment the code out again
# ***************************************************************************************************************

# # if  you haven't done already, install the "keyring" package on your system
# # install.packages("keyring")
# library(keyring)
#
# # Create a new key ring that is password protected (you will be prompted to set the password)
#keyring::keyring_create("TF_607final_keyring")
#
# # unlock your keyring to start using it
#keyring::keyring_unlock("TF_607final_keyring")
#
# # set the database username key (you will be prompted to enter the values)
#keyring::key_set(service = "TF_607final_keyring_user", keyring = "TF_607final_keyring")
#
# # set the database password key (you will be prompted to enter the values)
#keyring::key_set(service = "TF_607final_keyring_pwd", keyring = "TF_607final_keyring")
#
# #lock your keyring to stop using it
#keyring::keyring_lock("TF_607final_keyring")

# For more info on how to use keyring watch this video:  https://www.youtube.com/watch?v=Q8Cilx-MOsU
Step 7: Connect to database and import from TransactionLineView
We use the package RODBC to connect to our Azure SQL database and import data off of TransactionLineView.
#library(RODBC)

#
#keyring::keyring_unlock("TF_607final_keyring")
#
#connection_string <- paste('Driver={ODBC Driver 13 for SQL Server};
#                           Server=curdferguson1.database.windows.net,1433;
#                           Database=mba_affinity;
#                           Uid=', key_get(service = "TF_607final_keyring_user", keyring = "TF_607final_keyring"), ';
#                           Pwd=', key_get(service = "TF_607final_keyring_pwd", keyring = "TF_607final_keyring"), ';
#                           Encrypt=yes;
#                           TrustServerCertificate=no;
#                           Connection Timeout=30;', sep="")

#dbConnection <- odbcDriverConnect(connection_string)

#load raw data from SQL database
#transactions_raw <- sqlQuery(dbConnection, "SELECT * FROM TransactionLineView;")
#head(transactions_raw)

#write to .csv file
#write_delim(transactions_raw, "transactions_raw.csv", delim = ",", na = "", append = FALSE, col_names = TRUE)

# Close the database connection and lock keyring
#close(dbConnection)
#keyring::keyring_lock("TF_607final_keyring")
References:
Calbimonte, Daniel. “How to use BULK INSERT to import data locally and in Azure.” SQLShack. https://www.sqlshack.com/use-bulk-insert-import-data-locally-azure/
Kroenke, David M., Auer, David J., Vandenberg, Scott L. and Yoder, Robert C. Database Processing: Fundamentals, Design, and Implementation. 15th Ed. New York: Pearson, 2018.
UCI Machine Learning Repository. “Online Retail II.” https://archive.ics.uci.edu/ml/datasets/Online+Retail+II